
DIY Christmas Chalkboard Place Mats – Easy 4 Step Guide
Do you ever spend hours browsing all of the amazing projects on Pinterest, like DIY chalkboard place mats, and wonder if your version will turn out looking the same? Well, we’ve put together this simple and easy-to-follow guide so that yours look just as good!
What You Will Need:
- Small chalkboard place mat
- Rainbow chalk markers
- A small / medium sized bowl (to create a perfect circle)
How To Make Chalkboard Place Mats This Christmas
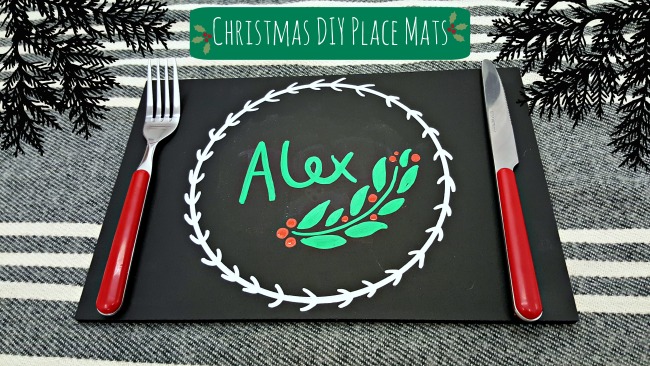
The great thing about these DIY chalkboard place mats is that you don’t need fantastic art skills and you can make them as simple or intricate as you like! Follow the steps below to create one that looks like the picture above.
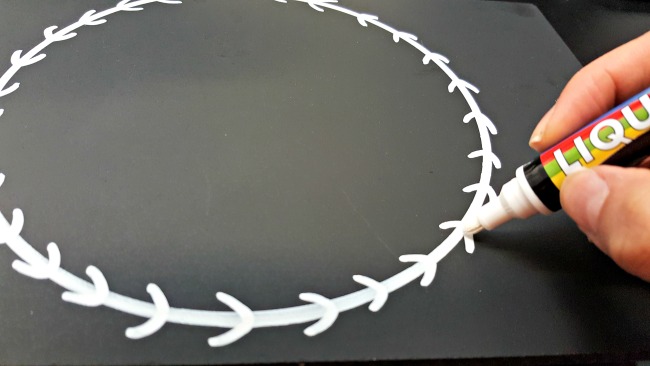
Step 1 – make a circle
Drawing a perfect circle is hard, so we drew around a bowl to ensure ours didn’t have any squiggly lines. All you need to do is place the bowl face down onto the chalkboard place mat, making sure that there is an equal distance between the edge of the bowl and the edge of the place mat. Then, draw around it with your chalk marker.
We chose to use white, but you can use any colour you like!
DID YOU KNOW: Liquid chalk markers offer a fantastic vibrant and bold finish compared to regular, old fashion chalk sticks. You will get much cleaner and precise lines using a marker.
Step 2 – making your circle into a wreath
The next step is to add small lines along the entire circle so that it replicates a Christmas wreath. The trick here is to try and space them out as evenly as possible and ensure that all the lines are facing the same way.
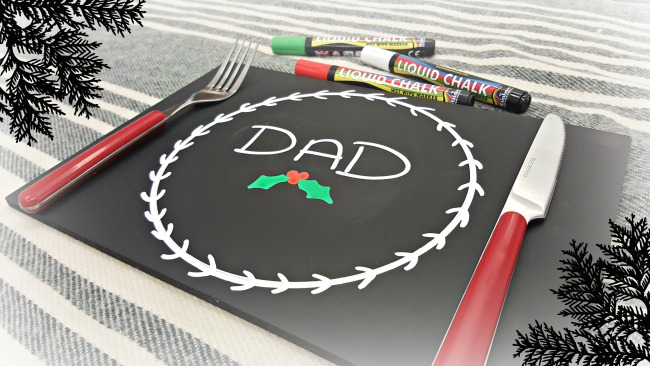
Step 3 – Adding a name
Now, add a name to the middle of your chalkboard place mat so that you can arrange who is sitting where at the table. We used a green pen for an added Christmas touch!
Remember, the size of your text will depend on the length of the name. Try to visualise how much space you will need to avoid it being too squished in the middle.
Or you can use a white pen to match the circular wreath for a more simplistic place mat. See below.
Step 4 – Finishing touches
We’re almost finished! You could just leave your chalkboard place mat with a wreath and a name, or you could add some extra decorations. We added some green foliage with red berries and some holly leaves to ours. You could add:
- Snowflakes
- A snow man
- A Christmas tree
- Rudolph the red-nosed reindeer
- Green mistletoe leaves with white berries
Now your DIY Christmas chalkboard place mat is ready to be put on your dining table with a knife and fork on each side!
We hope this tutorial was easy for you to follow and you are happy with the final products! The best part about Rainbow chalk markers is that you can wipe them away with a damp cloth if you make a mistake.
Get Your Chalkboard Place Mats & Rainbow Chalk Markers!
Add something special to the dining table this Christmas with personalised chalkboard place mats for your family and friends. All of the items you need for this project are in the product boxes below. Just select what you need from the drop down menus and then click ADD TO BASKET Or select our Christmas special offer pack that includes chalkboard paint, chalk markers and the easy clean remover.
First time buyers get 10% off when you add “ftb10” to the discount code box at the checkout!


Liquid Chalk Christmas Special
Original price was: £15.54.£12.00Current price is: £12.00. incl. VAT


Liquid Chalk Wet Wipe 5mm Bullet Assorted
£5.95 – £18.95 incl. VAT


Chalkboard Dining Placemats
£4.99 – £14.99 incl. VAT