DIY Palm Print Shabby Chic Table – Rainbow Tutorials
Sarah Williams, a professional furniture up-cycler who uses our Shabby Chic Chalk Paint, has been back at it again with her wonderful creations!
This week she’s going to teach you how to make a stunning palm print Shabby Chic table – it’s to die for!
If you didn’t see our last post, click here to read Sarah’s step-by-step tutorial for up-cycling a chest of drawers with our chalk paint.
How To Make A Palm Leaf Print Shabby Chic Table
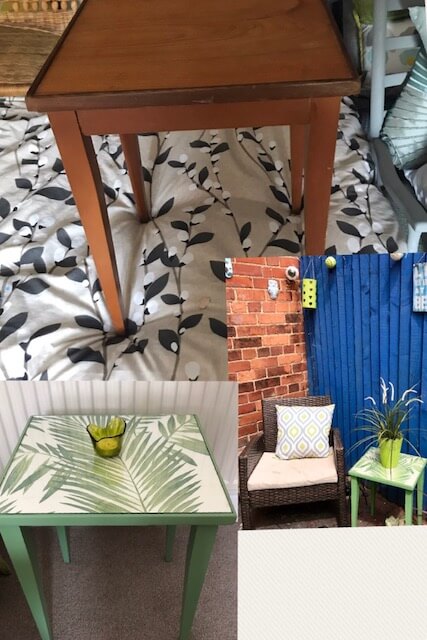
Sarah’s customer had a dull and dreary wooden side table – but that was going to change quickly.
What You Will Need:
- Side table
- Rainbow Chalk Paint in Cottage Green
- A paint brush
- Newspaper or protective film
- Rainbow Chalk quality Furniture Wax
- Palm leaf printed wallpaper
Painting Your Table Green
Simply stir the paint after opening the tin, dip your brush and start painting. It’s that easy!
The number of coats your Shabby Chic table requires depends on the look you are going for:
- Authentic shabby chic – 1 thin coat of paint will allow brush strokes and wood grain to show
- Bold and bright – 2 thick coats of paint will provide a more modern appearance with full coverage
Getting Tropical – Adding The Palm Leaf Print Effect
If, like us, you thought Sarah had painted that palm print on the top of the table… you’re mistaken.
As someone on the internet once said, “Ain’t nobody got time for that!“
In fact, Sarah used a piece of leaf print wallpaper that she secured down with glass to create this unique look. If you want to be particularly thrifty, you could go to a wallpaper shop and ask for a sample instead of buying a whole roll! (shh, you didn’t hear that from us)
Some tables already have removable glass surfaces but, if yours doesn’t, you can visit your local Glazing shop to get some cut.
Sarah recommends using glass that is at least 4mm thick as anything thinner could potentially crack and become unsafe.
All you need to do is cut your wallpaper to shape and then place the glass back down on the table to hold the paper in place.
If your table doesn’t have grooves along the edges to support a piece of glass on the top, Sarah suggests gluing the paper directly to the wood and then covering it with the Rainbow Furniture Wax to protect it from wear and tear.
Finishing Touches
Sarah added a layer of our clear furniture wax to ensure her customer’s Shabby Chic table would look good as new for years to come!
Adding our wax over the chalk paint protects the wood whilst preventing stains, chips and cracks from every day use.
Note: If your table doesn’t have glass on the top and you are gluing down your patterned paper, don’t add wax to the top of the table as your glue might not stick to the wax.
Inspired? Send us your pictures!
If Sarah’s palm leaf print shabby chic table has got your creative juices flowing, try it out for yourself and send your pictures in to info@rainbowchalk.com to feature on our Blog.
To see our full range of 37 chalky matte and metallic paints, click here. Available in 3 sizes, 125ml, 250ml & 1ltr.