
How to Create a Shabby Chic Glass-Top Coffee Table in 11 Steps!
In need of something to do while the kids are off school? We have the ideal, cost-effective DIY for you! In this blog post, we’ll show you how to create your own shabby chic glass-top coffee table.
Get the kids involved in your summer DIY projects
Our formula is non-toxic which means the whole family can help out! Since painting can be tedious and slow, why not buy some stencils & prints to make the process more fun for the kids? They could even decorate their own furniture with you in the garden!
What you will need:
- A glass-top coffee table
- Rainbow Shabby Chic Furniture Paint
- Fine & medium grade sandpaper
- Masking tape
- Rainbow Shabby Chic Furniture Wax
- A wallpaper of your choice
- Wallpaper paste or craft glue
- A ruler
- A Stanley knife or scissors
- A wet & dry cloth
- Glass cleaning products
- Old newspaper
- An assortment of paintbrushes
- Stencils and prints (if your little decorators are helping out)
11 steps away from a shabby chic glass-top coffee table!
1.) Remove glass top from table
Remove the glass top of your coffee table slowly. Place the glass down in a safe and sturdy place, well away from any children. Then, clean the glass with your cloth and cleaning products. Pay close attention to dust, fingerprints and dirt as they could ruin the appearance of your coffee table!
A little hint….
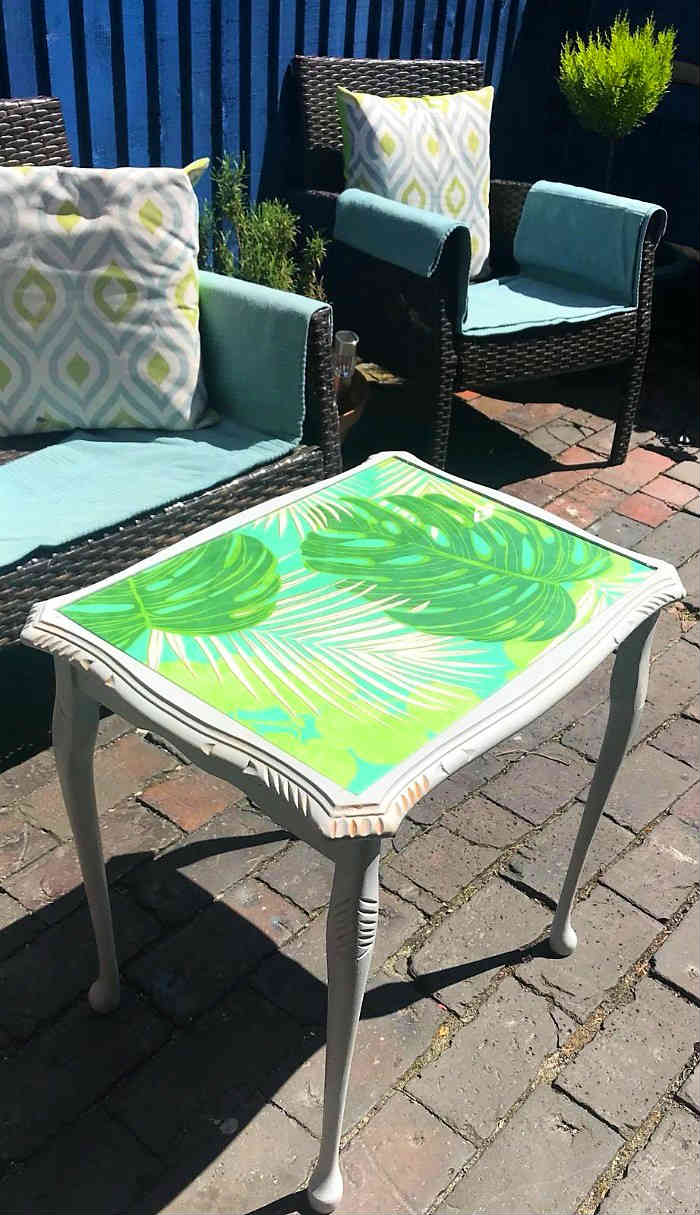
To achieve a similar look to the coffee table shown above, use the shade Chalky White or Winter Grey. However, if you’re going for a vibrant summer vibe, consider painting with our shades Cottage Green or Olivaceous. Alternatively, you can opt for a sleeker finish with our Metallic Green shade! It is important before you start painting to place old newspaper down to catch any paint spillages.
2.) Sand the cofee table
Lightly sand your table with fine-grade sand paper to create texture that the paint can stick to more easily.
A quick note…
Do not sand your table if it is made of dark wood. When sanded, dark wood bleeds with residue that can seep in to your paint and ruin it!
3.) Clean the coffee table
Wipe down your coffee table with a damp cloth, this will remove any dust or dirt. Once done, add masking tape to any areas you don’t wish to paint.
4.) Start painting!
Don’t worry about removing any old paint as our pigmented, thick formula was designed to apply effortlessly over older paint. We suggest applying 1-2 coats of paint for a shabbier look and three coats for a flawless finish. Apply with the grain of your furniture in even strokes for the best results.
5.) Allow to dry
Leave your coffee table to dry for 4-6 hours.
6.) Distress your coffee table (optional)
If you’re going for an authentic Shabby Chic look, use medium grade sandpaper to distress your coffee table. Sand away paint in areas that would naturally wear over time, like the table legs and corners. Gradually build the effect until you’re happy with it. Then, use your fine grade sand paper to make small adjustments.
7.) Choose and then cut your wallpaper
Consider the colour and pattern of your wallpaper before you choose it. If you were to move the coffee table in the future, would it suit another room in your home? You also need to think practically. For example, glitter wallpaper may look pretty under the glass, but what happens when the sun shines through the window? The sun will bounce off the glitter and create a horrible glare in your home!
Once you have measured the size of your wallpaper, cut along the lines with a Stanley knife to create the cleanest cut. However, the same look can be achieved by drawing a line with your ruler and slowly cutting with scissors. More care has to be taken this way to achieve a clean line.
8.) Stick the wallpaper down
Use wallpaper paste or craft glue to stick your wallpaper down on the coffee table base. Make adjustments to the position of the wallpaper before it dries. You should also check that the paste/glue cannot be seen around the edges.
9.) Allow the wallpaper to dry
It’s best to crack open a window for this as the fresh air will help the paste/glue dry faster!
10.) Place the glass top back on the coffee table
Again, check for fingerprints and smudges before you place it down.
11.) Wax your coffee table
Use Rainbow Shabby Chic Furniture Wax to give your new coffee table a dazzling sheen! As well as a glossy finish, our wax protects and maintains the finish of the paint.
Get your Rainbow Shabby Chic Furniture Paint now!
Your shabby chic glass-top coffee table is complete! Share a photo of your DIY project on our Facebook Page, or send a photo to info@rainbowchalk.com if you want your before / after to be featured on our blog. All of the products used in this tutorial can be found in the product boxes below – click ADD TO BASKET.
First time buyers get 10% off with discount code “ftb10” – enter at checkout!


Cottage Green Shabby Chic Furniture Paint
£12.55 – £26.95 incl. VAT

Metallic Green Shabby Chic Furniture Paint
£12.55 – £26.95 incl. VAT


Shabby Chic Furniture Wax
Original price was: £12.99.£8.99Current price is: £8.99. incl. VAT

Olivaceous Shabby Chic Furniture Paint
£12.55 – £26.95 incl. VAT

Winter Grey Shabby Chic Furniture Paint
£12.55 – £26.95 incl. VAT