DIY Shabby Chic Coffee Table Idea
Pinterest is great for interior design ideas – especially anything Shabby Chic. But with Pinterest inspiration often comes elbow grease and a long list of craft supplies…
We’ve got a more realistic, budget friendly DIY Shabby Chic coffee table idea for busy mums and impatient DIY enthusiasts!
All you need is:
- An old wooden table
- Shabby Chic Furniture Paint
- A paintbrush
- Wallpaper sample
- PVA glue (if you have a flat surfaced table – read on to find out why)
- Shabby Chic Furniture Wax (optional)
The majority of you will already have an old table laying around your home, if not, you can get one cheap as chips at a local second hand shop!
You’ll also most likely have a paint brush and some old wallpaper hiding under the stairs from your last decorating project. If you don’t have spare wallpaper to hand, you can be cheeky and grab a free wallpaper sample from your local hardware shop (shhh).
Before:
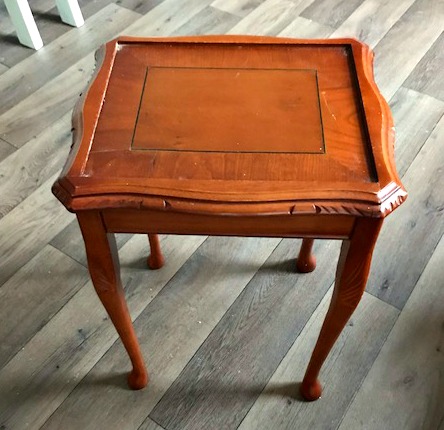
In this example the original table had a lovely shape and carved detailing around the rim, however, it was a little worse for wear and needed some TLC.
Thankfully the task was taken on by Sarah Williams, a Shabby Chic enthusiast who turned her hobby into a business.
How Sarah Made Her DIY Shabby Chic Coffee Table
Sarah used our Shabby Chic Furniture Paint in our Rhubarb and Custard colour to coat the table.
Using a medium sized paint brush, she covered the larger areas such as the legs and top but found a small painting brush was more effective for getting into the little nooks and crannies.
Approximately 30 minutes later, the first coat was dry to the touch and Sarah was in the clear to add the second coat – leaving an opaque, chalky finish.
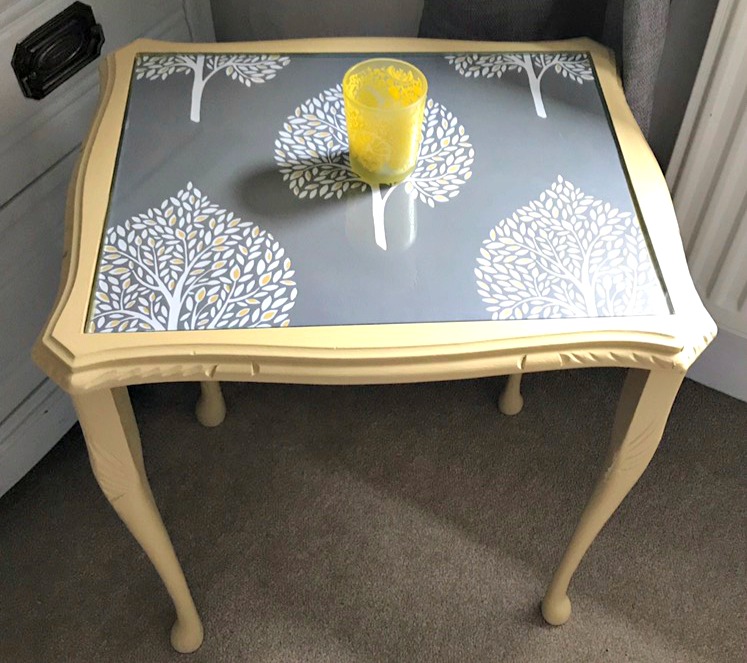
Measuring and cutting the wallpaper print
Next, Sarah cut her wallpaper sample to fit the top of the table. As you can see from the before picture, the table already had an indented surface which is ideal for this wallpaper trick, as it can be held down with glass…
However, you can still add wallpaper to a flat-surfaced table too – you just need some clear PVA glue to stick it down.
We recommend marking the measurements in pencil on the back of the paper and then using scissors to carefully cut it out.
Take your time when cutting the paper because you want it to look as neat as possible!
When the second coat of furniture paint was dry, Sarah placed the paper down and secured it with glass. If your table doesn’t have a removable glass surface, you can visit your local Glazing shop to get some cut.
After this step, the table looked like this:
If you are gluing paper to a flat-surfaced table, make sure you add enough glue to the edges so they are not lifting up – but not too much so that the glue spills out! If you have any accidents, the PVA glue should be wiped up immediately with a damp cloth to prevent it from leaving marks.
SARAH’S PRO TIP
Choose a wallpaper sample that complements the colour of your Shabby Chic Paint, but also the colour scheme of the room it’s going in. The yellow leaf details in my chosen wallpaper match the yellow features in the room, and the pale yellow Rhubarb & Custard paint contrasts the grey decorations nicely!
The Finishing Touches – Adding Longevity
The final step in creating your DIY Shabby Chic coffee table is to add a sparing layer of Furniture Wax.
The wax adds a protective shield over the chalk paint, preventing scratches and stains. It helps to lock in the colour and keep your table looking fresher for longer!
If your table doesn’t have the glass topper and you have glued the wallpaper to the top, add the wax on top of the wallpaper too – paying special attention to the edges. This helps to bond the wallpaper to the table and prevents the edges from peeling up.
The Big Reveal!
So, after minimal effort and expenditure, here’s the finished product!
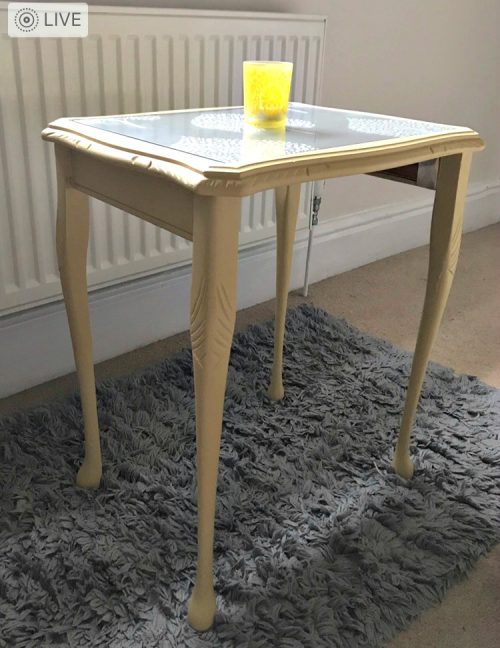
We think it looks fantastic!
Sarah also used the same method to create a green palm print table – check it out here!
Feeling Inspired? Get Your Shabby Chic Chalk Paint Today!
Rainbow’s luxury chalk paint is ideal for your quick, easy and affordable D.I.Y projects.
With 37 rich matte and metallic colours, there’s something for everyone. Click here to view the entire range or get your Rhubarb & Custard paint and Furniture Wax now, using the product box below!


Rhubarb & Custard Shabby Chic Furniture Paint
£12.55 – £26.95 incl. VAT


Shabby Chic Furniture Wax
Original price was: £12.99.£8.99Current price is: £8.99. incl. VAT